Showing posts with label javascript. Show all posts

Wednesday, September 14, 2016

First Days as A Developer: Nice to Meet You Backbone!


It has been already more than three weeks since I started working as a front-end developer. So, I decided to share some of my initial experience. The topic of this article might be helpful to many of you who are starting to work with real-life applications which are often quite big. To quickly understand such applications and their code is a skill every developer must master. In particular, this post will focus on how to understand large projects written in the Backbone JavaScript library.

This was precisely what I had to do when I started my new job. One of my first tasks was to work with a complex JavaScript application. This meant that it already had a particular code structure that must be respected by anyone who would want to modify it.

What made it even more challenging was the fact that this application was written in the JavaScript Backbone library with which I had no previous experience.

What to do in order to understand the application’s architecture in a way that will enable me to properly modify it? 

1. What is MVC?
When I googled what the Backbone is, I learned that it is a library for structuring JavaScript code which is based on the so-called Model, Controller, View (MVC) pattern. MVC is an architecture model for implementing user interfaces. It separates the application into three kinds of components – model (M), view (V) and controller (C). The idea is to promote a separation of concerns which should result in better structured and more maintainable applications. 
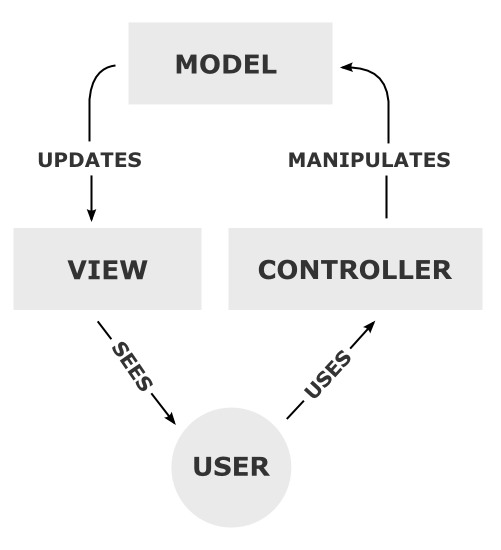
MVC Pattern

There are many other JavaScript libraries and frameworks that implement MVC pattern, for example: Ember, Angular, and React (to some degree). None of these frameworks are better or worse than the others, each is just designed for the different purpose.


2. What is Backbone?
When I learned that the application, I will be working on, is built with Backbone library, I thought that it can't be that difficult to understand it. Since I already knew how to build applications in React, I was pretty sure that this knowledge will help me to grasp the Backbone logic as well.

‘They’re all based on MVC pattern anyway, right?!’

‘...or not?!’

The truth is that React isn’t a classic MVC since it is considered only as V in MVC. Moreover, Backbone is neither an example of classic MVC. Although it provides the concept of models and views, its views are more like controllers (more on that later). 

So, there is no clear separation between models, views and controllers in Backbone.

I learned the difference between Backbone and React myself. If you compare the code structure of applications built in these two libraries, you will find out that it is pretty different. Nevertheless, they still have a lot in common. They are both great for building single page applications (SPA) which aim is to provide a rich user experience similar to desktop applications. In these applications, all the necessary code (HTML, CSS and JavaScript) is retrieved with a single page load.

Backbone has five components: events, models, collections, views and routers. However, to understand the Backbone logic, it is important to get to know the relationship between models and views.


Backbone modified MVC pattern (source: http://backbonejs.org/)

Models are containers for application data that can also send AJAX requests to the server to synchronize the data on the client with the server. On the other hand, views are responsible for rendering the models and listening to any events raised by the DOM or events raised by the model. Collection is just an ordered set of models.

When you open a typical Backbone application in your text editor or IDE, the folders will at least be named as models, views and collections. If your Backbone application contains dozens of files (as in my case), you might feel a little intimidated. Believe me, that is only the initial and wrong feeling.

The file names will often help you to understand the application's structure. You can tell from the names what a particular model or view actually do. You will also need to dive deep into the code to be able to understand it and work with it. Try to change a thing or two and refresh the browser to see how the changes affected the functionality. With this approach, you will eventually understand the basic logic of the application quite fast.

When you understand the basic logic of the application, you will be ready to actually produce a code on your own which will fit into the application's structure.


Sunday, August 14, 2016

Programming Job Acquired: Mission Accomplished

So it is finally here:


Monday was the last day in my legal job. Starting next Monday, I will be working as a front-end developer at medium-sized company. So, I think that this is the perfect time for me to reflect on my coding journey whose first scenario, which lasts from the beginning until this week, is coming to an end. However, at the same time, the second one is ready to begin.

In this post, I will share with you my 'coding journey in a nutshell' and interesting insights that I gained along the way.

My coding journey began on

26th November 2015

On this particular day, I bought my first programming online course on Udemy. Back then, my programming knowledge was equal to zero (triple equal to be precise). I was at the beginning of my journey. I had no idea that this decision will have such a huge impact on my future career.

Long story short, I got my first programming job on June this year. So, it took me seven months to learn how to code from scratch. However, I needed to wait two more months until the statutory notice period expires.


Coding Journey Part 1: Overview

At the beginning of my coding journey, I had no idea that I will be a professional programmer one day. I did not even know I was a type of a guy that can do that kind of job in the first place. My major concern was that I had no formal computer science education whatsoever. I was not even a fan of exact sciences at high school.

From my own experience, a lack of formal computer science education is the main reason why so many people are discouraged from trying to pursue a programming career. There is deeply rooted belief, that you need some kind of computer science education to be able to get a job as a programmer.

Of course, I thought this might be a hurdle for me too. However, the more I coded, learnt about coding and about other people’s experience, my state of mind began to change. I started to play with an idea that programming can be something more than just a hobby for me. I really enjoyed the creative process whose outcome is a fully functioning application made from scratch, which even do something useful.

I was literally consumed by it


At that time, I have been reading so many posts from people who switched to the programming career in a year. Well, that is a lot of time, you might say. But if you think about it, it is actually a pretty short period of time. If you are able to learn new skill from scratch and find a job in a year, well that is just awesome. Keep it mind, that people study many years to get a promising job.

I myself was able to get a job in seven months. The length of the period before you are able to get a job can be affected by many factors. You must choose your resources wisely. I already wrote two posts about JavaScript materials in general and React materials in particular. You must think about the way you learn all the time, since it is the main thing that makes a huge difference to your progress.


Turning-point No. 1: Feedback

There are so many other factors that affect your overall progress (motivation, regularity, spare time etc.). Some of them are more important than others. It is really useful to code regularly every day, as I wrote earlier. In my opinion, the most important is the one that is not fully under your control. It is feedback (check out my older post on this topic).

If you are not able to get any feedback, your progress will be much slower

When you are learning to code, it is not that difficult to get at least some. If you do not know any programmer personally, you still have whole internet overflowing with communities of people willing give you feedback for free. You can always find somebody who will tell you what is wrong or right with your code.


Of course, you can learn A LOT from your self-studies without anyone’s help. Nevertheless, you will eventually get to the point at which it will become more and more challenging for you to move forward effectively without any feedback. Your progress will be much smoother if you have a mentor who will tell you what is wrong with your code or how you should structure it better. There are so many issues that must be considered when writing proper code:
  • Is this really the best way how to write a particular code feature?
  • Should you use promise or callback in a given case?
  • Is jQuery a perfect library for this project?
  • What about React and Angular libraries, will not they be a better choice for this app?
  • What coding design pattern should you use?
Without any mentorship whatsoever, you will be forced to not only answer these questions yourself, but to figure out that you need to ask them in the first place. Of course you can do this on your own, but you will need to read a lot of other people’s code and articles to be able to do that. Moreover, it will certainly take a significant amount of your precious time.

I myself was able to get some feedback on my coding projects I built from my friends as well as from an online community.


Turning-point No. 2: Real-life Projects

However, getting some feedback will not be the only crucial point you will experience on your coding journey. At least, this was my case. As I was gaining experience, I started to feel that by working only on my own small applications, I was not able to tackle more complex coding issues and concepts. For example, you can take a look at my JavaScript calculator (guide). I am proud of it. However, it is a relatively small application. I started to feel that I need to work on some larger real-life projects to be able to make significant progress.

In my opinion, this is the right time to start looking for a job


However, when I started applying for the front-end developer positions, I was not in this phase yet. I wanted to wait at least a month to learn more about various JavaScript libraries and frameworks. I still needed a little more time.

The reason why I actually applied for a job at that time was pure coincidence. On May this year, I visited startup job fair in Prague (Czech Republic). After talking to the people from different companies, I was invited to several interviews. I told myself, that I had nothing to lose. If I will not get any job, I will at least have a better knowledge about employers' job requirements.

However, it worked out well and I got a job as a front-end developer


Coding Journey Part 2: New Beginning

Today, two months later, a couple of days before the first day in my new job, I can say that I find myself in the exact position I mentioned above, which is the right one to start looking for a job.

I am now even more confident that my decision was the right one and I am really looking forward to my new job


Friday, July 29, 2016

How am I learning React with Redux?


Roughly two months ago, I came to the conclusion that my knowledge of vanilla JavaScript is advanced enough. So, I decided to dive into one of the many JavaScript frameworks which would enable me to build more sophisticated apps.

I chose React library since I admired its smart architecture…just kidding :). I had no idea which framework or library to pick. I jumped into React because I heard that it is a simple component library suitable for my intended purposes. Moreover, many employers require it in their job descriptions.

In this post, I am going to describe how I started learning React with Redux and which resources helped me along the way.
If you find yourself in a similar position I was in two months ago, I hope you’ll find my learning path inspiring.


The Start


In the beginning, I needed to decide which React with Redux resources to pick. There are so many of them. Would it better to start with the official documentation, with a book or watch some video courses?

I decided to check the official docs first. However, this was not a smart decision since I had no idea about the logic of the library. I didn’t even know what some concepts meant since the only JS library I knew at that time well was jQuery. So, I skipped the docs for the time being.

Instead, I chose a book (ReactJS by Example - Building Modern Web Applications with React) and a video course (Modern React with Redux). Both resources claimed that they will teach me React (with Redux) in an accessible way.


The Book


I started with the book first. The style, in which it was written, seemed engaging to me at first. You’re learning React features from the conversation between senior web developer (React expert) and junior web developer (React newbie). I guess this is one of the few things I liked about this book.

However, the more I read the more I started to realize that there is a substantial downside to this writing style. It forces you to read too much of unnecessary text in order to understand a particular React feature. This fact made it difficult to just skim the text when, for example, you wanted to come back and re-read some topic. Moreover, the text also seemed often repetitive to me. Also, the code snippets in the book were not written in ES6 syntax, which is today’s standard of writing React apps.

These are the major reasons why I wasn’t able to finish it. I read roughly half of it.


The Course


In a short time after I begun reading the mentioned book, I started to watch the video course Modern React with Redux by Stephen Grider. Unlike the book, the course truly helped me to understand React and Redux. The instructor does a great job explaining React basics in a beginner-friendly way. You will learn not only how to write code properly, but also why are you writing it in a particular way. What I loved the most about instructor’s approach is that you’re building apps with React throughout the course. He will also write every single line of code with you – code along.

After few introductory videos, you will create the YouTube app where you will solidify your newly acquired knowledge. You are going to build your first React component, initialize a state and even make you first React AJAX call. After that, you’ll plug Redux in and create the Weather app using other JS libraries and frameworks as well. The final app, you’re going to make, will be a simple blog, where you will build a form in React and you will learn how to use React router library.

However, there are two things I missed in this course. Firstly, you don’t build your React developer environment yourself. Instead, you simply download it from the instructor’s Github account. From the hindsight, I think it is crucial for a React beginner (without any experience with node.js) to understand how is it possible that just by typing “npm start” into the console, your app magically appears on the screen. You might also have issues with understanding why the JSX code with ES6 syntax, you write throughout the course, can be read by the browser (hint: it is done by npm’s Babel package).

Secondly, I missed some theoretical introduction into the basics of React and Redux. When I’m learning something new, I need to understand the basic concepts and definitions from the beginning. This helps me a lot to fully understand the new material. For example, you won’t learn difference between React component, React element and React node in this course. However, I’m fully aware that this latter issue might be only my personal one.

To sum up, Stephen Grider’s Modern React with Redux course is a great introduction to React with Redux. It will teach you how to build fully functional apps with these technologies using modern ES6 syntax.


The Rest


Since I wanted to learn more about React and Redux, I tried another video course, this time from Cory House. Actually, he has two courses on React, one for beginners with Flux (with React.createClass syntax) and the other for not-React-beginners with Redux (using ES6 syntax). I did the latter one.

Although I knew that this course was not for beginners, I didn’t like the fact that the instructor just copied and paste the code most of the time. I’ve already done a couple of other advanced JS courses and in each of one of them, you code along with the instructor. The instructor was also too often referring back to his beginner’s course. This might get a little bit annoying sometimes. Because of this, I occasionally got a feeling that you needed to do the beginner’s course first in order to be able to get the most from the advanced course. 

On the other hand, the instructor provided an introductory lecture before each topic with a couple of slides. This really helped me to get into the particular React (Redux) topic (the thing I missed in the Stephen Grider’s course).

Despite the mentioned shortcomings, this course was very well organized and it helped me to understand React and Redux even more.


The Docs 
After going through all of the mentioned resources, I jumped back to the official React docs and read them all. This time around, I had no problem understanding it.
Currently, I am going through Redux docs and have no problems understanding it as well.


So, are you going to learn React with Redux too? 

If you’ve already jumped into React and Redux, please let me know, in the discussion, what resources you used and how efficient they were for you.

Friday, July 22, 2016

WebDevRes #1


Article

This article describes its author’s programming journey. As I mentioned in the previous post, the most difficult part of the coding learning process is to pass its intermediate stage, which is a phase between beginner and advanced programmer. The author of the article sees it the same way.
He makes also some very good points, for example that you should at least try to learn how JS frameworks and libraries work under the hood, which will help you to better understand JS functionalities.
The only problem I have with this article is that the author is only telling you which courses to take or which book to read, but he is not telling what you should do with the acquired knowledge. You should always keep in mind that the most important thing in a learning process is to build your own apps from scratch.


Blog post

This is a great article from Saron Yitbarek, founder of the code newbies, where she describes her personal experience with a programming Bootcamp. Among other things, you will learn what to look for when searching for the bootcamp that will meet your individual needs and that you should always carefully assess the employment percentage of the particular bootcamp’s graduates, since it can be easily manipulated.


Article

Have you ever thought about using JavaScript to program a piece hardware? …for example, to light up your LED?
This article will walk you through the process from getting your hardware to being able to control a LED with a JavaScript code using Node.js.
I was amazed by how simple is to get the hardware and to start control it with JavaScript. I'm even playing with the idea of buying the Arduino starter kit myself.


Blog post

I came across this blog post when reading the documentation to the React JS library. Its main massage is that you should always think hard about new ideas, which might seem like a nonsense to you at first. Before dismissing them straight away, you should ask questions about them instead. It is an easy task to dismiss someone’s unconventional idea, much harded task is to think about it and accept it .


Saturday, July 16, 2016

WebDevRes #0


As already mentioned, I will be regularly posting the most interesting resources (articles, blog posts, podcasts, tweets…), I encounter, that are somehow related to programming. These posts are called WebDevRes which stands for Web Development Resources and you're just reading the first post of this series - History in the making!

As you can see, the first "issue" begins with 0 and not with 1Do you know why?

Yep, you’re right, WebDevRes Weekly is a kind of an array of interesting links, and array index, as we all know, begins with 0!

Ok, (stupid) jokes aside and let’s get real.

Here are the top five links to interesting programming resources, I recently read or heard. Enjoy!


The author describes how to convince other people to read your article on Medium.com. However, many of the rules can be applied to any of your internet posts as well. The post also contains links to the articles analyzing what words you should use in your headline to get more readers. You will also learn how you should write your posts and that you shouldn’t be scared to show your credibility to your readers.


This is a great interview with Zed Shaw, author of the Learn the Hard Way series. What I personally like about him is his different approach to the code learning since he puts strong emphasis on the memorization. He claims that you need to memorize syntax of the programming language before you can jump into your first coding project.


This is a story about an aspiring web developer, who talks about his programming journey. The interesting part of the post is when he describes challenges he faced, when moving from a beginner to an advanced programmer. I bet that everybody undergoes such troubles when going through this particular period since you don’t know what you don’t know. The easiest way, how to move on, is to learn from other’s experience. You should therefore read this article!

The article describes differences between the two most popular JS frameworks - Angular and React. The author talks about the advantages as well as of disadvantages of each framework. Since many of the web developers need to use at least one of them, it is good to understand the differences between them.


If you’re using Atom text editor, this article is for you. If you don’t use it, you should at least give it a try J. This post is full of great packages which will enhance your productivity. Try the power mode package at least!


Friday, May 13, 2016

JavaScript Calculator Guide PART 2: Code! (Free Code Camp Challenge)


Welcome back!

This is my second post describing the implementation of the JavaScript calculator using the finite state machine (FSM). As I promised, I am going to start with the explanation of our FSM graph.

Graph
Although this graph might look a little bit complicated, it is actually pretty straightforward.


The graph displays many things about which, I have already talked about in my first post. You can see the variables (top of the picture) as well as individual states (in the rectangles).
From each state, you can see arrows pointing to the next states. Above every one of them is a text, separated by a slash, explaining what causes the transition into the next state and how it affects the variables.

The words before the slash refer to the calculator’s key that is clicked on:
  • num – number key
  • op_key – operator (except equal sign) key
  • equal – equal sign key
  • dot – dot key

The words after the slash refer to the defined variables which are affected by the pressed key.

  • For example, if you are in the START state of the calculator and you press a number key, you will get to the FIRST_ARG state and disp variable will have a new value which is the same as the particular number of the pressed key (num/disp = num).  If you press a number again, disp variable will get a new character space which is the same as the value of the pressed key (num/disp += num). However, if you press an operator instead, variable op will be equal to that operator (op_key/op = op_key) and disp variable won’t get a new character, instead the acc1 variable will be equal to disp (acc1 = disp) because we want disp to be able to store a new second number which will be pressed after the operator.

This behavior is basically the same for the transitions between all the other states.

See? It isn’t that difficult, is it?

Only thing we need to do is to transform this graph into a code!

Code: The Set Up
Let’s start with the definition of the object kclass that will store all the calculator’s keys that can be pressed. This will help us later in the code to recognize which key was pressed. As you can see, these are simply keys which can be found on any calculator.

 1
 2
 3
 4
 5
 6
 7
 8
 9
10
11
12
13
//object containing key categories that can be clicked
var kclass = {
  //number
  NUM: 1,
  //dot
  DOT: 2,
  //operator
  OP: 3,
  //clear entry
  CE: 4,
  //equal
  EQ: 5
}

The only key that is missing is AC (all clear) key, which resets the calculator’s memory. We will talk about this key later on. On the other hand, you can see a CE (clear entry) key which resets only the currently displayed input.

Now, we are going to define an object with all the calculator's states which you can also see in our graph.

 1
 2
 3
 4
 5
 6
 7
 8
 9
10
11
12
13
14
15
16
17
18
19
//object containing states
var states = {
  //default state
  START: 1,
  //when the first number is added
  FIRST_ARG: 2,
  //when the first number begins with a dot (0.) or when it has a dot anywhere else
  FIRST_ARG_FLOAT: 3,
  //when the operator is added
  OP: 4,
  //when the second number is added
  SECOND_ARG: 5,
  //when the second number has a dot not at its beginning
  SEC_ARG_FLOAT: 6,
  //when the second number begins with dot(0.)
  SEC_ARG_DOT: 7,
  //when we get the result of the arithmetic operation
  EQ: 8
}

Now, let’s create an object calc that will contain all the functionality related to our calculator. I am going to separate this complex object into smaller snippets of code for the clarity's sake.

Let’s start with the declaration of the variables. Note that the state variable is set to the START state and other variables are empty. This is the default state of the calculator.

 1
 2
 3
 4
 5
 6
 7
 8
 9
10
11
var calc = {
  //monitors current state
  state: states.START,
  //monitors current operator
  op: "",
  //monitors what is currently displayed on the display
  disp: "",
  //stores the first number for further operations
  acc1: "",
  //stores the second number for further operations
  acc2: "",

Keep in mind, that you need to give classes and ids to the elements in your HTML document because you need to select them in a JavaScript code.

My code presupposes these selectors:
  • display of the calculator (id=“display”)
  • all number keys (class=“digit”)
  • all operators (except equal sign) keys (class=”op_key”)
  • dot key (class=”point”)
  • equal sign key (class= “equals”)
  • AC key (class=“allClear”)
  • CE key (class=“clearEntry”)

Code: FSM
Remember, that we are still inside the calc object. The main functionality that controls transitions between the states will be stored in the function doStep. This function represents the implementation of a FSM. It takes two arguments: a category of key that is clicked on (these are defined in the object kclass) and the particular value of the clicked HTML element  (number or operator). Inside this function, we will use a switch for transitioning between the individual states of the calculator. Each switch case will represent a particular state.

 1
 2
 3
 4
 5
 6
 7
 8
 9
10
11
12
13
14
15
16
  //function that controls transitions between states using switch
  //two arguments - key_class(key category), key(specific key)
  doStep: function(key_class, key){
      switch (this.state){
         case states.START:
            if(key_class === kclass.NUM){
                //state action
                this.dispSet(key);
                //move to the next state
                this.state = states.FIRST_ARG;
            }
            if(key_class === kclass.DOT){
                this.dispSet("0.");
                this.state = states.FIRST_ARG_FLOAT;
            }
            break;

Since the state variable is set to the default START state at the beginning, this state will be our starting state. Each switch case describes what choices we have in this particular state of the calculator. You can see that the only two things we can do in the START state is to press a number key or a dot key (if you look into our graph, you will see the same behavior). By pressing a number key, the first character will be a number. If you decide to press a dot key first, the first character will be “0.” instead. Function dispSet updates the disp variable with a value from its argument which is in this case the pressed HTML element (key) or “0.”. After that, it calls the displayUpdate function which (surprisingly) updates the display of the calculator.
At the end of every switch case, state of the calculator is updated.

 1
 2
 3
 4
 5
 6
 7
 8
 9
10
11
12
13
14
15
16
17
18
19
20
        case states.FIRST_ARG:
            if(key_class === kclass.NUM){
                this.dispAppend(key);
                this.state = states.FIRST_ARG;
            }
            if(key_class === kclass.OP){
                this.op = key;
                //store value of the disp in a acc1 variable in order to be able to store second number in the disp
                this.acc1 = this.disp;
                this.state = states.OP;
            }
            if(key_class === kclass.DOT){
                this.dispAppend(key);
                this.state = states.FIRST_ARG_FLOAT;
            }
            if(key_class === kclass.CE){
                this.dispSet("0");
                calc.state = states.START
            }
            break;

The second state is FIRST_ARG. You can see that it works just as a first state. The only difference is that you have now much more choices, i.e. you can press a range of buttons which will affect the arithmetical operation differently. Function dispAppend differs from the function dispSet in a way that it concatenates two strings together rather than set a brand new value of the variable.

 1
 2
 3
 4
 5
 6
 7
 8
 9
10
11
12
13
14
15
16
17
18
19
20
21
22
23
24
25
26
27
28
29
30
31
32
33
34
35
36
37
38
39
40
41
42
43
44
45
46
47
48
49
50
51
52
53
54
55
56
57
        case states.FIRST_ARG_FLOAT:
            if(key_class === kclass.NUM){
                this.dispAppend(key);
                this.state = states.FIRST_ARG_FLOAT;
            }
            if(key_class === kclass.OP){
                this.op = key;
                //store value of the disp in a acc1 variable in order to be able to store second number in the disp
                this.acc1 = this.disp;
                this.state = states.OP;
            }
            if(key_class === kclass.CE){
                this.dispSet("0");
                calc.state = states.START;
            }
            break;
        case states.OP:
            if(key_class === kclass.NUM){
                this.dispSet(key);
                this.state = states.SECOND_ARG;
            }
            if(key_class === kclass.DOT){
                this.dispSet("0.");
                this.state = states.SEC_ARG_DOT;
            }
            break;
        case states.SECOND_ARG:
            if(key_class === kclass.DOT){
                this.dispAppend(key);
                this.state = states.SEC_ARG_FLOAT;
            }
            if(key_class === kclass.NUM){
                this.dispAppend(key);
                this.state = states.SECOND_ARG;
            }
            if(key_class === kclass.EQ){
                //store the second number in the acc2 variable so that we can use it if the equal sign is pressed more than once
                this.acc2 = this.disp;
                //calculate the result
                this.operation(this.acc1, this.disp);
                this.displayUpdate(this.disp);
                this.state = states.EQ;
             }
            if(key_class === kclass.OP){
                //calculate the result
                this.operation(this.acc1, this.disp);
                this.op = key;
                //store the result of the operation in the acc1 in order to be used in the next operation
                this.acc1 = this.disp;
                this.displayUpdate(this.disp);
                this.state = states.OP;
            }
            if(key_class === kclass.CE){
                this.dispSet("0");
                calc.state = states.OP;
            }
            break;

The important thing in the SECOND_ARG state is a situation when we press an equal sign (EQ). If we do this, the disp variable is firstly stored in the acc2 variable because we need to remember this value for the scenario if we wanted to press equal sign again. Secondly, the function operation takes two numbers as arguments and performs a particular calculation with them. The type of the calculation is determined by the value of the op variable, which was set earlier when the operator key was pressed.

 1
 2
 3
 4
 5
 6
 7
 8
 9
10
11
12
13
14
15
16
17
18
19
20
21
22
23
24
25
26
27
28
29
30
31
32
33
34
35
36
37
38
39
40
41
42
43
44
45
46
47
48
49
50
51
52
53
54
55
56
57
58
59
        case states.SEC_ARG_FLOAT:
            if(key_class === kclass.NUM){
                this.dispAppend(key);
                this.state = states.SEC_ARG_FLOAT;
            }
            if(key_class === kclass.EQ){
                this.acc2 = this.disp;
                this.operation(this.acc1, this.disp);
                this.displayUpdate(this.disp);
                this.state = states.EQ;
             }
             if(key_class === kclass.OP){
                 this.operation(this.acc1, this.disp);
                 this.op = key;
                 this.acc1 = this.disp;
                 this.displayUpdate(this.disp);
                 this.state = states.OP;
             }
             if(key_class === kclass.CE){
                 this.dispSet("0");
                 calc.state = states.OP;
             }
            break;
        case states.SEC_ARG_DOT:
            if(key_class === kclass.NUM){
                this.dispAppend(key);
                this.state = states.SEC_ARG_FLOAT;
            }
            if(key_class === kclass.CE){
                this.dispSet("0");
                calc.state = states.OP;
            }
            break;
        case states.EQ:
            if(key_class === kclass.EQ){
                this.operation(this.disp, this.acc2);
                this.displayUpdate(this.disp);
                this.state = states.EQ;
            }
            if(key_class === kclass.NUM){
                this.dispSet(key);
                this.state = states.FIRST_ARG;
            }
            if(key_class === kclass.OP){
                this.op = key;
                this.acc1 = this.disp;
                this.state = states.OP;
            }
            if(key_class === kclass.DOT){
                this.dispSet("0.");
                this.state = states.FIRST_ARG_FLOAT;
            }
            if(key_class === kclass.CE){
                this.dispSet("0");
                this.clearer();
            }
            break;
      }
  },

So, we are finally at the end of the doStep function. You can see that the logic that controls transitioning between the states is pretty straightforward. It just repeats itself again and again for every state. This is the power of the FSM.

The next part of our calc object is composed of methods about which we already talked about. The only method, I haven’t mentioned is the clearer method which is used when the AC (all clear) key is pressed. So, it simply resets the memory of the calculator.

 1
 2
 3
 4
 5
 6
 7
 8
 9
10
11
12
13
14
15
16
17
18
19
20
21
22
23
24
25
26
27
28
29
30
31
32
33
34
35
36
37
38
39
40
41
42
  //does all the arithmetical operations
  operation: function(first, sec){
      if(this.op === "Ă·"){
          this.disp = first / sec;
      }
      if(this.op === "-"){
          this.disp = first - sec;
      }
      if(this.op === "x"){
          this.disp = first * sec;
      }
      if(this.op === "+"){
          this.disp = Number(first) + Number(sec);
      }
      if(this.op === "%"){
          this.disp = first % sec;
      }
  },
  //restarts the calculator to the default state
  clearer: function(){
      $("#display").text(0);
      this.state = states.START;
      this.op;
      this.disp;
      this.acc1;
      this.acc2;
  },
  //appends a display var
  dispAppend: function(key){
      this.disp += key;
      this.displayUpdate(this.disp);
  },
  //set a new value to the display var
  dispSet: function(key){
      this.disp = key;
      this.displayUpdate(this.disp);
  },
  //dipsplay display var
  displayUpdate: function(dispText){
      $("#display").text(dispText);
  }
}

Finally, to finish our project, the last thing we need to do is to set click listeners for the calculator’s keys and then define what will happen when a particular key is pressed. Most of the time we are just calling the doStep function with different arguments.

 1
 2
 3
 4
 5
 6
 7
 8
 9
10
11
12
13
14
15
16
17
18
19
20
21
22
23
24
25
26
27
//when the number is clicked
$(".digit").on("click", function(){
  calc.doStep(kclass.NUM, $(this).html());
})
//when the operator is clicked
$(".op_key").on("click", function(){
  calc.doStep(kclass.OP, $(this).html());
})
//when the equal sign is clicked
$(".equals").on("click", function(){
calc.doStep(kclass.EQ, $(this).html());
})
//when the dot is clicked
$(".point").on("click", function(){
calc.doStep(kclass.DOT, $(this).html());
})
//when AC clicked - clear all variable values
$(".allClear").on("click", function(){
calc.clearer();
})
//when CE clicked - erase the last entered input
$(".clearEntry").on("click", function(){ calc.doStep(kclass.CE, $(this).html()); }) //default state of calculator $("#display").text(0);

Code: The Conclusion
To sum up, the hardest thing in the process of the implementation of the JavaScript calculator using the FSM was the creation of the graph which we used as a blueprint for our code. In this graph, we needed to address every possible behaviour of the calculator and display it in the graph. Once we finished our graph, the implementation of the calculator was much easier since we basically applied same logic from our graph over and over.

You can check my JS calculator with its code on my github or my codepen account.

I hope that my posts helped you to build your own JS calculator. Maybe you build according to my buide or maybe you just got inspired by my posts and you choose a different way of how to implement the calculator. And that is allright, because the final version of your project is always a reflection of yourself.


If you like this post, or if you have any suggestions or critique, feel free to write a comment below. I would greatly appreciate it.